
因为一个小伙伴刚刚问了这个问题,松哥抽出时间卷一篇文章和大家聊聊这个话题。
加密解密本身并不难。问题是什么时候处理?定义过滤器也是拦截请求和响应的一种 *** 。虽然这种 *** 粗糙但灵活,因为它可以获得之一手请求参数和响应数据。SpringMVC 给我们提供 ResponseBodyAdvice 和 RequestBodyAdvice,这两种工具可以预处理请求和响应,非常方便。
所以今天的文章有两个目的:
- 分享参数/响应加解密的想法。
- 分享 ResponseBodyAdvice 和 RequestBodyAdvice 的用法。
嗯,那我们就不废话了。让我们看看。
1.开发加解密 starter
为了让我们开发的工具更加通用,也为了复习自定义 Spring Boot Starter,在这里,我们将这个工具制成 stater,以后在 Spring Boot 可直接引用项目。
首先,我们创建一个 Spring Boot 项目,引入 spring-boot-starter-web 依赖:
<dependency><groupId>org.springframework.boot</groupId><artifactId>spring-boot-starter-web</artifactId><scope>provided</scope><version>2.4.3</version></dependency>因为我们的工具是 Web 项目开发后必须用于 Web 环境,所以这里添加依赖 scope 设置为 provided。
添加完成后,我们将首先定义一种备用加密工具。有多种方案可供选择,对称加密和非对称加密,包括对称加密AES、DES、3DES 等不同的算法,这里我们用 Java 自带的 Cipher 用于实现对称加密AES 算法:
publicclassAESUtils{privatestaticfinalStringAES_ALGORITHM="AES/ECB/PKCS5Padding";//获取cipherprivatestaticCiphergetCipher(byte[]key,intmodel)throwsException{SecretKeySpecsecretKeySpec=newSecretKeySpec(key,"AES");Ciphercipher=Cipher.getInstance(AES_ALGORITHM);cipher.init(model,secretKeySpec);returncipher;}//AES加密publicstaticStringencrypt(byte[]data,byte[]key)throwsException{Ciphercipher=getCipher(key,Cipher.ENCRYPT_MODE);returnBase64.getEncoder().encodeToString(cipher.doFinal(data));}//AES解密publicstaticbyte[]decrypt(byte[]data,byte[]key)throwsException{Ciphercipher=getCipher(key,Cipher.DECRYPT_MODE);returncipher.doFinal(Base64.getDecoder().decode(data));}}这个工具类比较简单,不需要解释。需要注意的是,加密数据可能不可读,所以我们通常需要重复使用加密数据 Base64 算法编码获取可读字符串。换句话说,上面的 AES 加密 *** 的返回值是 Base64 编码后的字符串,AES 解密 *** 的参数也是 Base64 编码后的字符串,先对该字符串进行解码,然后再解密。
接下来,我们将包装一个响应工具备用。如果你经常看松哥的视频,你已经知道了:
publicclassRespBean{privateIntegerstatus;privateStringmsg;privateObjectobj;publicstaticRespBeanbuild(){returnnewRespBean();}publicstaticRespBeanok(Stringmsg){returnnewRespBean(200,msg,null);}publicstaticRespBeanok(Stringmsg,Objectobj){returnnewRespBean(200,msg,obj);}publicstaticRespBeanerror(Stringmsg){returnnewRespBean(500,msg,null);}publicstaticRespBeanerror(Stringmsg,Objectobj){returnnewRespBean(500,msg,obj);}privateRespBean(){}privateRespBean(Integerstatus,Stringmsg,Objectobj){this.status=status;this.msg=msg;this.obj=obj;}publicIntegergetStatus(){returnstatus;}publicRespBeansetStatus(Integerstatus){this.status=status;returnthis;}publicStringgetMsg(){returnmsg;}publicRespBeansetMsg(Stringmsg){this.msg=msg;returnthis;}publicObjectgetObj(){returnobj;}publicRespBeansetObj(Objectobj){this.obj=obj;returnthis;}}接下来,我们将定义两个注释 @Decrypt 和 @Encrypt:
@Retention(RetentionPolicy.RUNTIME)@Target({ElementType.METHOD,ElementType.PARAMETER})public@interfaceDecrypt{}@Retention(RetentionPolicy.RUNTIME)@Target(ElementType.METHOD)public@interfaceEncrypt{}这两个注释是两个标记。在以后的使用过程中,哪种接口 *** 添加了 @Encrypt 注解加密返回哪个接口的数据,添加哪个接口/参数 @Decrypt 注解密哪个接口/参数。这个定义也比较简单,没什么好说的。需要注意的是 @Decrypt比 @Encrypt另一个使用场景是 @Decrypt 可用于参数。
考虑到用户可能配置自己的加密 key,因此我们再来定义一个 EncryptProperties 类读取用户配置 key:
@ConfigurationProperties(prefix="spring.encrypt")publicclassEncryptProperties{privatefinalstaticStringDEFAULT_KEY="www.itboyhub.com";privateStringkey=DEFAULT_KEY;publicStringgetKey(){returnkey;}publicvoidsetKey(Stringkey){this.key=key;}}我在这里设置了默认 key 是 www.itboyhub.com,key 是 16 位字符串,松哥的网站地址刚刚满足。以后如果用户想自己配置 key,只需要在 application.properties 中配置 spring.encrypt.key=xxx 即可。
所有准备工作完成后,应正式加解密。
这篇文章的一个重要目的是与大家分享 ResponseBodyAdvice 和 RequestBodyAdvice 的用法,RequestBodyAdvice 解密时没有问题, ResponseBodyAdvice 在加密过程中会有一些局限性,但影响不大。之前所说,如果你想非常灵活地控制一切,你更好定制过滤器。在这里,我将首先使用这两个工具。
还有一点需要注意,ResponseBodyAdvice 你用了 @ResponseBody 注解时会生效,RequestBodyAdvice 了 @RequestBody 注解时会生效,换言之,前后端都是 *** ON 交互时,这两个有用。但一般来说,界面加解密的场景只有在前端和后端分离时才能发生。
先看接口加密:
@EnableConfigurationProperties(EncryptProperties.class)@ControllerAdvicepublicclassEncryptResponseimplementsResponseBodyAdvice<RespBean>{privateObjectMapperom=newObjectMapper();@AutowiredEncryptPropertiesencryptProperties;@Overridepublicbooleansupports(MethodParameterreturnType,Class<?extendsHttpMessageConverter<?>>converterType){returnreturnType.hasMethodAnnotation(Encrypt.class);}@OverridepublicRespBeanbeforeBodyWrite(RespBeanbody,MethodParameterreturnType,MediaTypeselectedContentType,Class<?extendsHttpMessageConverter<?>>selectedConverterType,ServerHttpRequestrequest,ServerHttpResponseresponse){byte[]keyBytes=encryptProperties.getKey().getBytes();try{if(body.getMsg()!=null){body.setMsg(AESUtils.encrypt(body.getMsg().getBytes(),keyBytes));}if(body.getObj()!=null){body.setObj(AESUtils.encrypt(om.writeValueAsBytes(body.getObj()),keyBytes));}}catch(Exceptione){e.printStackTrace();}returnbody;}}我们自定义 EncryptResponse 类实现 ResponseBodyAdvice接口,泛型表示接口的返回类型,这里有两种 *** :
supports:该 *** 用于判断哪种接口需要加密,参数 returnType 表示返回类型。这里的判断逻辑是 *** 是否包含 @Encrypt 注意,如果有,说明接口需要加密,如果没有,说明接口不需要加密。 beforeBodyWrite:这种 *** 将在数据响应之前执行,即我们首先对响应数据进行二次处理,然后将其转换为 json 返回。这里的处理 *** 很简单,RespBean 中的 status 状态码不需要加密,另外两个字段重新加密后可以重新设置值。 另外需要注意的是,自定义 ResponseBodyAdvice 需要用 @ControllerAdvice 注释标记。接口解密:
@EnableConfigurationProperties(EncryptProperties.class)@ControllerAdvicepublicclassDecryptRequestextendsRequestBodyAdviceAdapter{@AutowiredEncryptPropertiesencryptProperties;@Overridepublicbooleansupports(MethodParametermethodParameter,TypetargetType,Class<?extendsHttpMessageConverter<?>>converterType){returnmethodParameter.hasMethodAnnotation(Decrypt.class)||methodParameter.hasParameterAnnotation(Decrypt.class);}@OverridepublicHttpInputMessagebeforeBodyRead(finalHttpInputMessageinputMessage,MethodParameterparameter,TypetargetType,Class<?extendsHttpMessageConverter<?>>converterType)throwsIOException{byte[]body=newbyte[inputMessage.getBody().available()];inputMessage.getBody().read(body);try{byte[]decrypt=AESUtils.decrypt(body,encryptProperties.getKey().getBytes());finalByteArrayInputStreambais=newByteArrayInputStream(decrypt);returnnewHttpInputMessage(){@OverridepublicInputStreamgetBody()throwsIOException{returnbais;}@OverridepublicHttpHeadersgetHeaders(){returninputMessage.getHeaders();}};}catch(Exceptione){e.printStackTrace();}returnsuper.beforeBodyRead(inputMessage,parameter,targetType,converterType);}} 首先要注意,DecryptRequest我们没有直接实现 RequestBodyAdvice 接口继承自 RequestBodyAdviceAdapter 类,这类是 RequestBodyAdvice 接口的子类,以及界面中的一些 *** ,当我们继承 RequestBodyAdviceAdapter 只需要根据自己的实际需要实现几种 *** 。 supports:该 *** 用于判断哪些接口需要处理接口解密。这里的判断逻辑是,该 *** 或参数中含有 @Decrypt 注解接口,解密问题。 beforeBodyRead:该 *** 将在参数转换为特定对象之前执行。我们先从流中加载数据,然后解密数据,然后重构 HttpInputMessage 对象返回。接下来,我们将定义自动配置类,如下:
@Configuration@ComponentScan("org.javaboy.encrypt.starter")publicclassEncryptAutoConfiguration{}没什么好说的,比较简单。
最后,resources 目录下定义 META-INF,然后再定义 spring.factories 文件如下:
org.springframework.boot.autoconfigure.EnableAutoConfiguration=org.javaboy.encrypt.starter.autoconfig.EncryptAutoConfiguration这样,当项目启动时,配置类别将自动加载。
到目前为止,我们的 starter 就开发完成啦。
2.打包发布
我们可以将项目安装到当地仓库,也可以发布到网上供他人使用。
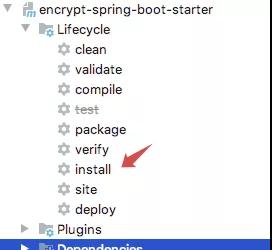
2.1 安装在当地仓库
安装到当地仓库相对简单,直接 mvn install,或者在 IDEA 中,点击右边的 Maven,然后双击 install,如下:
2.2 在线发布
不能在网上发,可以用 JitPack 来做。
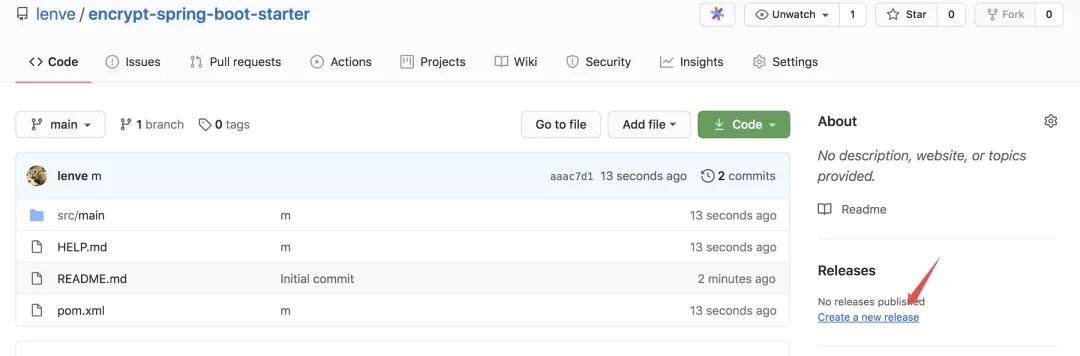
首先,我们在 GitHub 在上面创建一个仓库,上传我们的代码。我不需要多说这个过程。
上传成功后,点击右边的 Create a new release 按钮,发布正式版,如下:

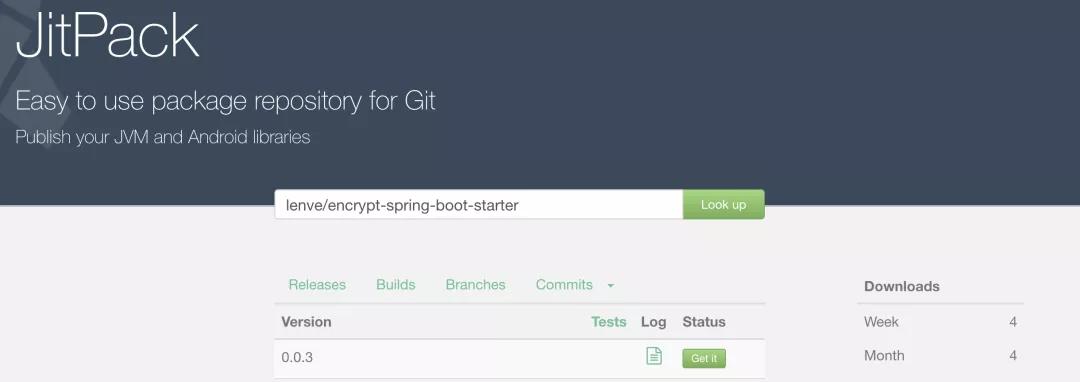
成功发布后,打开 jitpack,点击 lookup找到 按钮后,点击 Get it 按钮完成构建,如下:
建设成功后,JitPack 将给出项目引用 *** :
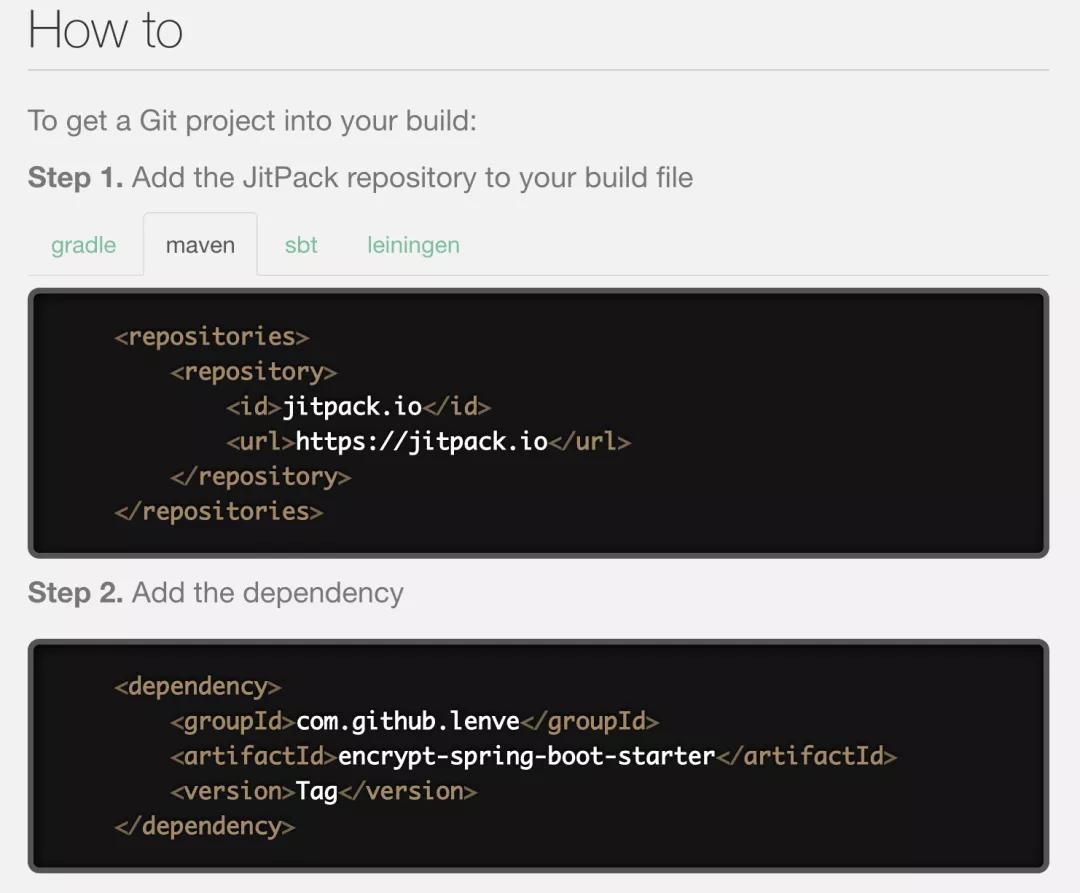
引用时注意 tag 改为您的具体版本号。
到目前为止,我们的工具已经成功发布!朋友们可以用以下 *** 引用这个 starter:
<dependencies><dependency><groupId>com.github.lenve</groupId><artifactId>encrypt-spring-boot-starter</artifactId><version>0.0.3</version></dependency></dependencies><repositories><repository><id>jitpack.io</id><url>https://jitpack.io</url></repository></repositories>3.应用
我们创造了一个普通的 Spring Boot 项目,引入 web 依赖,然后介绍我们刚才的 starter 依赖如下:
<dependencies><dependency><groupId>org.springframework.boot</groupId><artifactId>spring-boot-starter-web</artifactId></dependency><dependency><groupId>com.github.lenve</groupId><artifactId>encrypt-spring-boot-starter</artifactId><version>0.0.3</version></dependency><dependency><groupId>org.springframework.boot</groupId><artifactId>spring-boot-starter-test</artifactId><scope>test</scope></dependency></dependencies><repositories><repository><id>jitpack.io</id><url>https://jitpack.io</url></repository></repositories>然后创建实体类备用:
publicclassUser{privateLongid;privateStringusername;//省略getter/setter}创建两个测试接口:
@RestControllerpublicclassHelloController{@GetMapping("/user")@EncryptpublicRespBeangetUser(){Useruser=newUser();user.setId((long)99);user.setUsername("javaboy");returnRespBean.ok("ok",user);}@PostMapping("/user")publicRespBeanaddUser(@RequestBody@DecryptUseruser){System.out.println("user=" user);returnRespBean.ok("ok",user);}}用于之一个接口@Encrypt 注释,因此接口数据将被加密(如果不使用注释,则不会加密),第二个接口将使用 @Decrypt 所以会解密上传的参数,注意 @Decrypt 注释可以放在 *** 或参数上。
然后启动项目进行测试。
首先测试 get 请求接口:
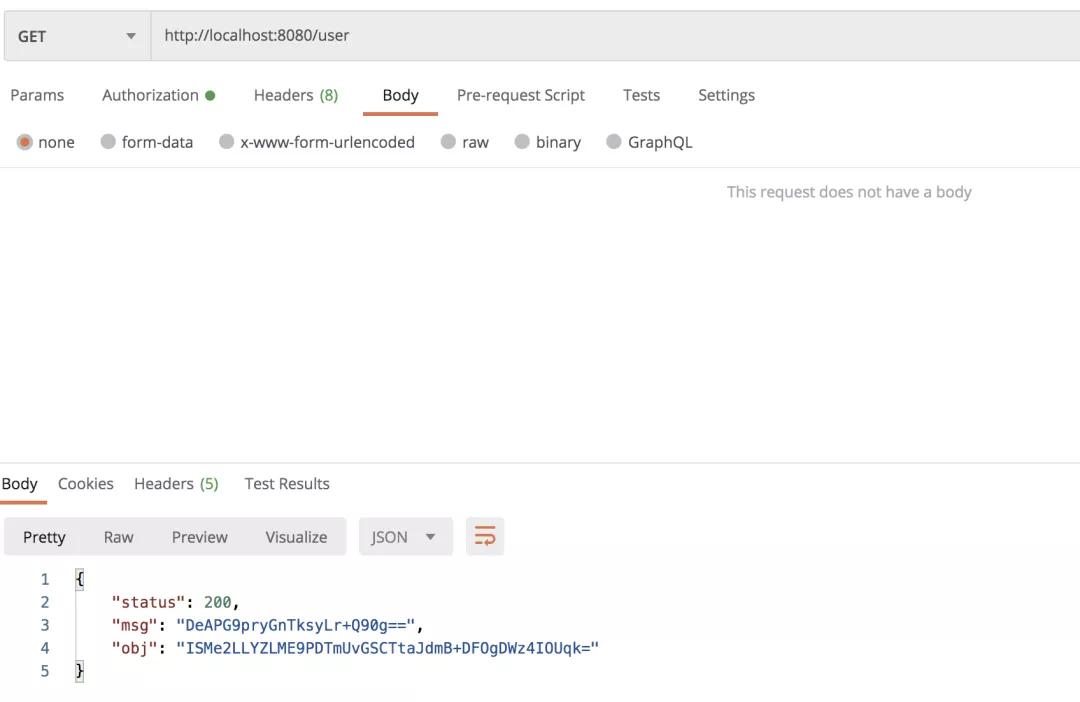
可回的数据已经加密。
再来测试 post 请求:
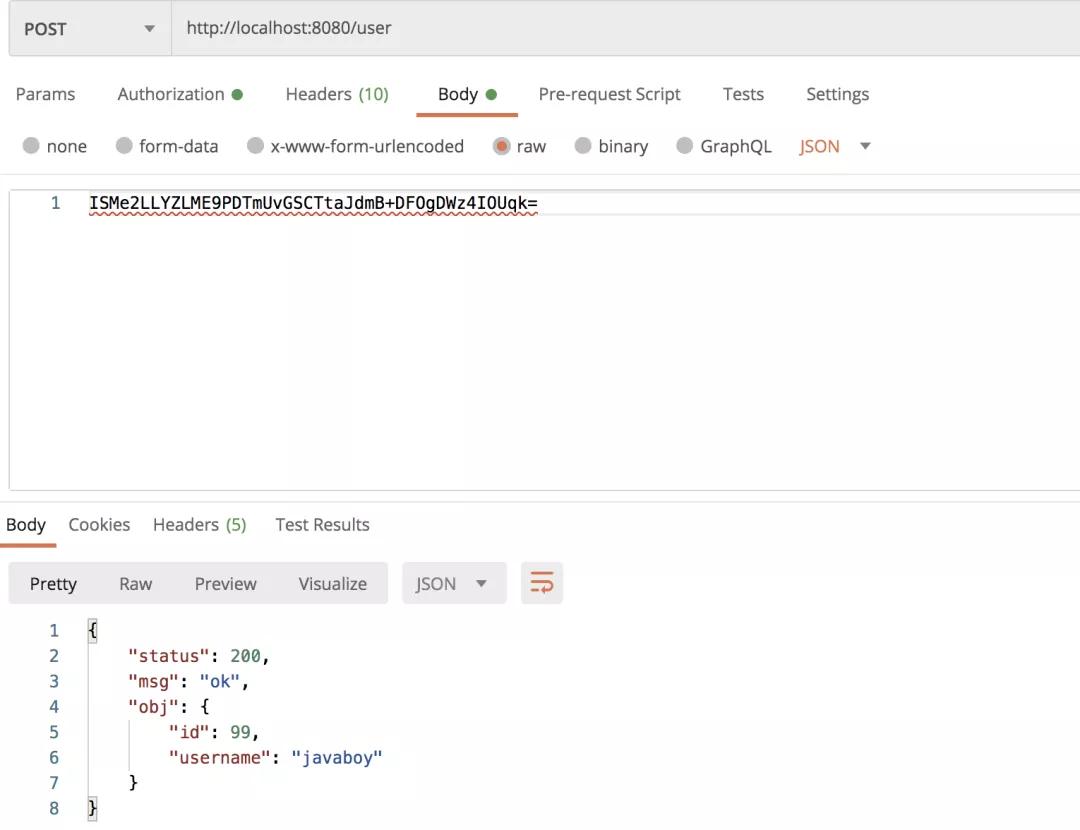
参数中的加密数据已经恢复。
如果用户想修改密钥,可以在 application.properties 添加以下配置:
spring.encrypt.key=1234567890123456
加密数据到了前端,前端也有一些 js 工具处理加密数据,这个松哥有时间告诉你 js 加解密。
4.小结
嗯,今天的文章主要是想和你谈谈 ResponseBodyAdvice 和 RequestBodyAdvice 的用法,一些加密思路,当然 ResponseBodyAdvice 和 RequestBodyAdvice 还有很多其他的使用场景,朋友可以自己探索~本文在对称加密中使用 AES 算法,也可以尝试改为不对称加密。
本文转载自微信公众号「江南一点雨」,请注意以下二维码。转载本文,请联系江南一点雨微信官方账号。